Please ensure Javascript is enabled for purposes of website accessibility

Tagged with 'acoustics'

isole Sound Barrier Sheets and RVs

We love it when Audimute customers get creative with our acoustic solutions. Here's a great example from Warren L., who writes:

"I have a Class C motor home and a lot of noise comes into the cab from [the] rear of the motorhome. The manufacturer suggested a curtain to block noise to the cab from the rear. I chose isolé Sound Barrier Sheets after some research. I installed them and tested them. What a difference! [...] Considering this was an ad hoc install, I was very impressed with the curtains. They look great. I am very pleased with my isolé sheets."

Thanks, Warren! In addition to its effectiveness when mounted over doors or windows, isolé makes a great partition, and we're happy it's bringing you some peace of mind on the open road. Wishing you safe and (great) sound travels!

Reverberation Rooms

News out of England that recently caught our attention: Meta has opened a $16 million lab to conduct audio research and development for the company's AI glasses and other AI equipment. In addition to anechoic and semi-anechoic chambers, the lab also features what it is calling "one of the world’s largest configurable reverberation rooms," equipped with "101 individually adjustable acoustic panels" to simulate different environments ranging in size.

Whereas anechoic chambers completely absorb sound (to the point that people have reported feeling disoriented after standing in one for a prolonged period of time), reverberation rooms are designed to create reverberation and send sound energy around the space. In fact, when an acoustics company like Audimute wants to calculate the noise reduction coefficient, or NRC, of its acoustic panels, it sends them to laboratories that test the acoustic products in such reverberation rooms. NRC ratings range from 0.0 (no absorption) to 1.00 (total absorption), with Audimute's panels boasting NRC ratings as high as 0.95.

We're excited to learn more about the role that acoustics will play in, as Meta says, "developing intelligent audio that adapts to users and their surroundings." And, hey, Meta - if you ever want to build a reverberation room stateside, feel free to reach out to our Acoustic Specialists for a consultation!

Soundproofing or Sound Absorption?

Many times at Audimute, we'll hear from folks who need help with "soundproofing." Their office is too echo-y, there's some high-frequency sound in their restaurant, they want to be able to hear their drums, etc. All completely valid acoustic concerns; except the solution they're looking for isn't soundproofing; it's sound-absorbing. 
 
At Audimute, we do both (more on that later). But let's delve into what those terms really mean. 
 
Soundproofing has become the easy, shorthand term for any kind of sound management solution, but it really only speaks to a specific kind: the total containment of a room or space so that no sound is getting in or out. 100% soundproofing is possible, but it can result in an acoustic environment so tightly regimented that it ceases to be comfortable (check out anechoic chambers for more).  
 
Maybe you don't want 100% soundproofing, but you do want to block some sound from getting into or out of a space. There are plenty of scenarios where where that's the case: 

  • You live in a house next to noisy train tracks
  • You own a loud rock venue and don't want your sound to bleed into the quiet coffeeshop next door 
  • You live in a house next to noisy train tracks and a loud rock club 
  • You own a loud rock club located inside a house next to a quiet coffeeshop by train tracks

...You get the idea. 
 
Soundproofing – in the truest sense - requires new construction: tearing up a wall, adding a false floor, etc. It requires a significant amount of time, money, and labor. In short, it can be done, but it calls for a lot of commitment.
 
Sound absorption, on the other hand, is the use of mounted products such as acoustic panels to absorb echoes, reverberations, and mid to high frequencies within a room (We often tell people to think of sound waves as water and a sound-absorbing acoustic panel as a giant sponge soaking up those sound waves). There's installation involved with sound-absorbing panels, but likely no construction. 
 
Let's futher explore the difference between soundproofing and sound absorption with some real-world scenarios featuring our friend, Audie: 
 
Audie wants to drum loudly in his home studio but he doesn't want to disturb his neighbors. 
Audie needs a soundproofing solution. (Like our Peacemaker® Sound Barrier – 3mm). 
 
Audie is drumming but his drums sound muddy due to echoes in his home studio. 
Audie needs a sound-absorbing solution. (Like our Sound Absorption Sheets). 
 
Here's another one: 
 
Audie's clients at work have a hard time hearing him during conference calls due to reverberations in his meeting room. 
Audie needs a sound-absorbing solution. (Like our Fabric Acoustic Panels). 
 
Audie's desk at work is constantly rumbling and shaking due to vibrations from the parking garage downstairs. 
Audie needs a soundproofing solution. (Like our Peacemaker® Soundproofing Underlayment – 6mm). 
 
One last one: 
 
Audie wants to drum loudly in his home studio but he doesn't want to disturb his neighbors AND he wants his drums to sound less echo-y in his home studio. 
Audie needs a sound-absorbing AND soundproofing solution (Like our 2-in-1 isolé® Sound Barrier Sheets). 
 
In summation, when it comes to soundproofing vs. sound absorption, here's a nifty little rhyme to help you remember the difference: 
 
If loud noise is coming through the walls, floor, or roofing 
Then the solution you want is soundproofing
But if echoes create distraction and distortion, 
Then the solution you want is sound absorption
 
Ready to discover your sound-absorbing or soundproofing solution? Contact our Acoustic Specialists for a free acoustic consultation

Emile Berliner

While we celebrate 20 years of acoustic solutions at Audimute, we also want to celebrate the legacy of those who came before us. Today, we're highlighting the contributions of Emile Berliner.


Today, Berliner is best remembered as the inventor of the gramophone and for his groundbreaking work in helicopters and rotary engines. But he also had a lifelong interest in acoustics, which prompted him to develop the Berliner acoustic tile in the 1920s (below).


As one newspaper explained it at the time, Berliner's acoustic solution called for a room with poor acoustics to be "covered with hollow paper discs covered with thin wires to hold their shape. These are what Dr. Berliner calls 'sound sponges,' the principle being to absorb sound waves, preventing reflection." These discs were then concealed by a layer of specially made porous cement.


Berliner unveiled his concept for the first time at a meeting of the American Institute of Architects on October 8, 1925. Soon after, in February 1926, he received U.S. Patent No. 1573475 for his acoustic tile concept:


After another year of testing, Berliner gave the first public demonstration of his 'sound sponges' in February 1927 at the James F. Oyster School in Washington, D.C., during a lecture in the institution's 3,700-square-foot assembly hall by Lieutenant Benjamin H. Rigg, a member of the 1925 MacMillan Arctic Expedition. The results were immediately apparent: Lt. Rigg could be heard clearly, without echoes or reverberations distorting his speech. 


Word spread quickly. Soon after, Berliner installed his "Resonant Walls" at Drexel University, the New York Cotton Exchange, and even the board room of a financial institution in India.


Sadly, just as his work in acoustics was starting to find an audience, Berliner passed away in 1929 at age 78. It's unclear if "Berliner's Resonant Walls" continued to be installed after his death. 


(Images courtesy of Library of Congress, Motion Picture, Broadcasting and Recorded Sound Division & the United States Patent and Trademark Office)

Good Nature Therapy Services

When pediatric Speech-Language Pathology and Occupational Therapy practice Good Nature Therapy Services contacted Audimute about sound management solutions for its brand new clinic in Aurora, Ohio, better acoustics weren't just a preference — they were a necessity for Good Nature's clients, many of whom have sensory processing difficulties that are worsened by background noise, echoes, and overall poor acoustics.

In addition to reverberations in the clinic's gymnasium and therapy rooms, there were also acoustic issues in the lobby area, where conversations containing sensitive medical and personal information were at risk of being amplified.

Working off a concept by Cleveland's innovative Richardson Design, Audimute introduced several acoustic solutions to absorb these echoes, reverberations, and mid to high frequencies:

- Custom AcoustiColor® Direct Mount Ceiling Panels designed to resemble tree canopies and clouds
- AcoustiColor Wall Panels installed around the top edges of therapy rooms
- Custom made Fabric Acoustic Panels intended for use as push pin bulletin boards
- Custom size Fabric Acoustic Panels arranged in a "shiplap" style

The result: an acoustically treated clinic where clients with sensory integration difficulties can better communicate and patient privacy is protected.

Need an acoustic solution for your healthcare facility, workplace, or home? Contact Audimute today for a free consultation with our team of Acoustic Specialists.

A Buyer's Guide for Beginner Drum Sets: What to Look for When Buying Your First Drum Set


From how to install acoustic sound panels to what to look for when buying your first drum set, Audimute Acoustic Specialists answer it all. With the holidays around the corner, our specialists created a buyer’s guide for beginner drum sets to make shopping for your new drummer a little easier.


Buying Your First Drum Set

When purchasing a new “beginner kit,” it’s important to understand it is unlikely to hold up throughout the rigors of new students who isn’t not well-versed in the “do’s and don’ts” of how to handle a kit yet. Ultimately, if this kit is ruined, the value of the instrument and its ability to function is ruined also.


Beginner kit resale value is important because your young drummer will either:

• graduate to a more sophisticated instrument

• lose interest in playing altogether


Either way, what to look for when buying your first drum set is a beginner kit that will net you an 80 to 100% return on investment, which isn’t an unreasonable goal if you’ve done you’re research and shopped smart. A good approach is to figure out just what you’re willing to shell out and look at the used market based on that figure.


Used Kit Shopping Guidelines:


Manufacturer: No buyer’s guide for beginner drum sets would be complete without mentioning the top drum brands. There are a lot of good companies out there making decent entry level stuff that sounds good, holds up well, & holds resale value (specifically, Pearl, Yamaha, Mapex, and Tampa). With any manufacture, make sure all drums have top and bottom heads – this is everything to do with sound quality and resale value.


Size: You want to make sure that the bass drum & toms can be of a size that will most comfortably fit your drummer. Really young – or height & reach-challenged students – will require smaller diameters & depths (mounted toms) to ensure the best practice & eliminate a lot of frustration.

  Average sets found on display at your local stores will be;

Bass drums: 20” to 22”

Mounted toms from 10” to 13”, & depths from 8” to 11” or even 12”


When talking about size, what to look for when buying your first drum set is your child’s physical ability to “get around” it. This includes seat height, which may present a challenge depending upon how adjustable the drum throne is. This is where it all begins, so a wobbly, unstable seat will really mess up your student’s balance and control.


If your child is 4’ tall or under, make sure that when they sit, the upper legs are just above a 90% angle, with their feet solidly on the floor. This is when the real measuring begins. Next, and only after seating has been established, look at reach. Your student’s arm length should never have to be fully extended to reach any part of the set. They should be able to reach the furthest object (cymbal, tom, etc.) and easily get back to a position of (roughly) a 90% angle from the forearms being vertical with the upper body.


Sometimes it’s even advisable to consider “holding off” adding toms over the bass drum, which is where they’re usually positioned. Either have the means to offset the toms, via floor stand, or (in extreme circumstances) consider not adding any mounted toms for the time being. No kid wants to hear that, but a functional core set up is important enough that waiting a little while to grow into it is a better than getting their technique screwed up because they had to “adjust” themselves to an uncomfortable, unnatural posture to accommodate the other stuff.


Hardware: What to look for when buying your first drum set is five key stands and mounts properly hold a drum set together.

• Hi Hat Stand: No compromises here, your stand needs to be sturdy. It takes a lot of abuse, just by its nature, and a cheap, too light-weight, off-brand model will breakdown & a waste of money. If the Hi Hat stand doesn’t seem right, opt to exclude it from the total purchase or negotiate a price that will give you some head room to purchase a replacement, soon than later. Again, resale value will hold up better.

• Bass drum foot pedal: Shopping for this is similar to shopping for your Hi Hat stand. Your student will need something sturdy that can take a hit. If your kit doesn’t come with a strong enough foot pedal, be sure to find one as soon as possible, as learning on a weak one does neither your practice nor your drum any favors.

Snare stand: Here you can get away with something less substantial. The drum sits on it – and unless it is subjected to brutal, foolish use, a light weight stand should suffice. As long as it’s in good, functional condition, you can save a few bucks here.

Cymbal stands: Two stands are a very good start; one for the bigger ride cymbal and one for a smaller crash cymbal. Again, these don’t have to be heavy duty, but avoid off- brand pieces or any stands that appear unstable.

A good way to start is by setting one stand up in what is called a boom stand function. This is where the top tier of the stand has an attachment that allows the “arm” (where the cymbal mounts) to be able to “boom” over to a more comfortable position to play. The second stand certainly can benefit from this design, but generally isn’t as necessary, so what is called a straight stand is okay, and again potentially lowers the cost.

Tom mounts: These hold the toms in place, either directly affixed to the top of the bass drum or on a separate stand. Your tom mounts should be reasonably heavy duty and adjustable for different position options. You can retrofit this item, sometimes very easily, or you may have to do some modifications.


Knowing what to look for when buying your first drum set ensures your student starts on the right track. Follow our buyer’s guide for beginner drum sets for the best equipment then check out some absorption sheets to soundproof your new practice space. We're happy to answer any of your acoustic questions - fill out a free room analysis form or call an Acoustic Specialist at (866) 505-MUTE for personalized advice about your practice space.


Finding Reflection Points in a Home Theater

Home Theater Acoustics

Are you ready to improve the acoustics of your home theater? We receive countless inquiries about home theater treatment each day, and the most commonly asked question is where acoustic panels should be applied to most effectively improve the sound quality in the theater. Today, I am going to take you step-by-step on finding reflection points and how you can use this as a guide for perfect panel placement.

First, we need to discuss what reflection points are. The primary reflection points are the points throughout your theater at which sound is initially reflecting. In other words, it’s the first surface that sound comes in contact with after leaving your speakers. Primary reflection points are important to find as these are the most effective treatment points throughout your home theater.


Home Theater Reflection Points

Now picture this: you just finished your home theater set up! You spent hours shopping for the right speakers, the most comfortable couch, and the best screen or projector. You throw in your favorite movie and notice something: you forgot to take the room acoustics into consideration! Fear not! That echo you’re noticing can be treated by adding acoustic panels to your theater!

To find the reflection points, you will need the following:

      • A home theater

      • A handheld mirror

      • Sticky notes

      • A patient friend


1. First, set up the room as if it were finished. Speakers and seating in your space should be placed in their final

home Theaters
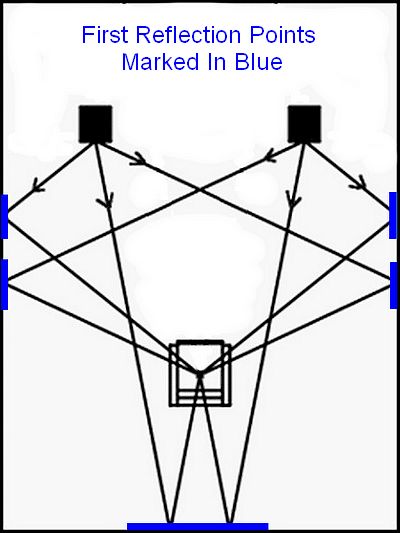
locations. Moving any of these elements will change the primary reflection points of sound throughout your space.

I recommend leaving the walls mostly bare (aside from any speakers). This will make the process of marking and finding reflection points much easier.

Once the walls are bare and the speakers are in their final position, it’s time to start listening. Carefully examine where the sound is coming from in the theater.

2. Second, have your friend hold the handheld mirror parallel to the wall surface. Face the screen in your theater, and move the mirror around the walls until you can see any speakers reflected in the mirror. Be sure not to move your head or tilt the mirror throughout this process, as this will alter the reflection points. Mark these points with a sticky note. These are the primary reflection points.

Reflection Points

Each speaker in your space should have 6 reflection points (one on each of 4 walls, one on the ceiling, and one on the floor). For a 5-speaker system, there should be 30 reflection points. Some of these points may not be treatable. This would include points that are blocked by open hallways, furniture, or other objects. This is not an issue. While treating primary reflection points is important, treating every reflection point is not necessary to improve the sound quality in your theater.

3. Once you have the reflection points marked, you can begin adding absorption.                 

For reflection points on the floor, consider adding a rug. If the theater is carpeted, treating the floor should not be necessary. For any windows, consider adding curtains or drapes.

To treat any reflection points on the ceiling, consider flush-mounting Acoustic Tiles to the ceiling surface, or suspending Acoustic Clouds from the ceiling.

Acoustic Panels in Home Theater

            Ceiling Acoustics                                                  

4. Finally, for the reflection points on the walls, consider adding Acoustic Panels. With a variety of sizes, colors, and styles to choose from, Audimute Acoustic Panels are an excellent option to consider for any home theater application.

For more advice on creating the perfect home theater, please don’t hesitate to contact one of our Acoustic Specialists!

Quick Tips for Setting Up a Drum Room

Drum room set up

November is International Drum Month. That means that now is the perfect time to set up your home drum room! When setting up your drum room, make sure to keep in mind the acoustics of your space. This will help to keep your neighbors (and the cops) away, while also ensuring that the space sounds great. 

Follow these helpful tips to help improve the acoustics of your drum room for yourself and your neighbors.


1) Consider drum kit location Drum kit location

Where you place the kit can have an impact on the sound in your drum room. For the best results, I would recommend placing the kit in the corner of your room, facing out towards the room. Keep the kit away from any shared walls. This will help to push sound into the room, instead of directly at any walls, and will help with the process of enclosing the kit, which brings us to the next tip…


Enclosed drum room

2) Enclose the kit (to the best of your ability)

Enclosing the kit can help to create a barrier around the drums. This will help to weaken the sound before it has a chance to reach the walls of your drum space. This can be accomplished using our Absorption Sheets. Placing Absorption Sheets behind the kit (one on each wall) will reduce the amount of sound reflecting off the walls. Hanging Sheets in front of the kit will help to effectively enclose the kit, creating a “room-within-a-room” with Absorption Sheets.


3) Treat any windows

Windows are a common point if weakness in most structures. Adding mass and density to any windows can help to reduce the amount of sound traveling through them. Creating a plug for the window using a heavy, rigid board is one option to consider. Isole® can be another great option to consider. The Peacemaker® inside of the Isolé is designed to help block the amount of sound capable of escaping through a window.

4) Don’t forget about doors

It’s important to treat any doors to your drum room. Anywhere air can travel, sound can also travel. Because of this, sealing off the door to your room will help to reduce the amount of sound capable of escaping your space. Isolé can also be a great option for door treatment, helping to provide mass and density to the door to your drum room.

Following these tips will help to improve your drum room for yourself, and all those around you. For additional questions on treating a drum room, please feel free to give our Acoustic Specialists a call at (866)505-6883.

What Are Acoustic Ceiling Clouds

Acoustic Ceiling Clouds

What is an acoustical ceiling cloud?

Ceiling clouds are designed to effectively reduce reflected sound in large and open environments as well as to delineate space. Stylish lines and soft shapes suspend horizontally from the ceiling and absorb sound across their entire surface for unequaled acoustical performance.

Ceiling Clouds create a modern appearance combined with noise reduction and reverberation control in most environments including residential and commercial spaces. Along with exceptional sound absorption and superior aesthetics, clouds feature outstanding architectural design flexibility and visual interest.


Are there other ways to perceive space?

Walls are perhaps the easiest and most recognizable architectural elements that define a room. Current design trends are focused on rooms that flow into one another without visual obstacles. Clouds are a subtle yet distinct method of delineating the differences that exist between areas.


How is a ceiling cloud different?


acoustic clouds

There is an acoustical benefit to exposing the backside of clouds. More air heightens the panel’s ability to capture and convert echo from the open space.

Acoustic clouds are hung parallel and offset from the ceiling allowing them to absorb sound waves at two points. Sound absorption occurs as sound travels toward the ceiling and then again as it bounces back to the floor. This dual-absorption ceiling cloud reduces echo and dampens noise.


Key Features:

     • The perfect soundproofing solution for areas with limited wall space

     • Dual sound absorption

     • Define spaces and accentuate a feature area

     • Mix and match sizes and shapes

     • Custom configurations available

     • Suspend individually or in groups


Acoustic ceiling clouds are the ideal solution for absorbing reflections from ceilings, reducing sound reverberation, and improving speech intelligibility!


How a Plastic Bottle Becomes Fabric

How a Plastic Bottle Becomes Fabric


“Green” acoustics. How many times have you heard that? If you work at Audimute, you hear it on a daily basis.

So what exactly is it?

We’ve developed a highly effective eco-friendly alternative to acoustic panels. Our line of eco-C-tex® use 1/10 of the energy required to produce fiberglass and 1/4 of the energy used to create acoustic foam panels.


In fact, we love recycling, being eco-friendly and using raw materials that are naturally better for your interior space! It’s our global responsibility. So it’s only fitting that when it comes to our manufacturing process, we choose our textiles carefully and we share a mutual understanding with our vendors. Guilford of Maine, our acoustic fabrics vendor, takes pride in the fact that 53% of their products are made from 100% recycled materials and 86% of their products contain recycled content in some form or another. Read more about how Guilford of Maine recycles plastic bottled into fabrics here!

We use this high-quality, eco-friendly acoustic fabric to cover our top-selling fabric acoustic tiles and panels. Each product is hand assembled by our production team right here in Beachwood, Ohio to ensure we meet & exceed your expectations.


To learn more about our products, contact one of our Acoustic Specialists!