Please ensure Javascript is enabled for purposes of website accessibility

Tagged with 'home'

FAQ: How To Reduce Traffic Noise

Open windows and balconies on busy streets can cause almost unlivable home, apartment, and condo noise. In this blog, we explain how to reduce traffic noise using acoustic panels.

Q:           My wife and I own a condo on the sixth floor of a building that fronts a busy street. We’re looking to learn how to reduce traffic noise on our balcony, which spans 2/3 of the width of our condo. I believe that the bulk of the noise is reflected from the balcony ceiling. The balcony decks are concrete, and the ceiling of our balcony is the underside of the deck above. Our ceiling is unfinished, and I am reluctant to drill into the concrete, so would prefer an adhesive application. The ceiling is 27' wide and 5'4" deep. The balconies are partially enclosed (Lexan panels on the lower half, screens on the upper) and the ceiling is largely protected from the weather, although in heavy rains some moisture will penetrate a few inches from the outside edge of the ceiling due to runoff from the deck above. Any help quieting our condo noise is appreciated.

A:            How to reduce traffic noise is a common question Audimute is asked. You are correct is assuming that a bulk of the condo noise is being reflected off of the ceiling of your balcony, and using absorption here will definitely help to reduce the amount of sound that is built up within your space.

Since the bottom half of the balcony is Lexan this, too, is helping to hold the reflected sound in and causing the sound pressure levels to build up. Treating the ceiling is most definitely the right way to go.

We would suggest our lightweight AcoustiColor™ flexible design acoustics for a custom color choice or natural sound absorbing wall tiles for a muted appearance. Made from our eco-C-tex recycled material, these lightweight frameless panel options are custom painted instead of fabric wrapped and can be mounted on the ceiling using a heavy duty construction adhesive instead of drilling holes into the concrete. It’s important to note that eco-C-tex is not designed for outdoor applications, but will hold up in situations where it is shielded from the harsher elements.

On a ceiling this size, a 12 pack of the 2'x4' panels would help to reduce the reflection off of the ceiling enough to make a noticeable difference. Keep in mind, though, that absorption materials will not eliminate the sound but help to reduce the build up of sound in the balcony causing your condo noise, resulting in what should be a quieter and more enjoyable space.

If you’re looking for how to reduce traffic noise in your home, check out our natural and custom colored eco-C-tex tiles, or call an Acoustic Specialist at (866) 505-MUTE for personalized advice.

FAQ: How To Modify Open Floor Plan Acoustics

Open floor plan acoustics can determine how well you’re able to enjoy your home or office. Before modifying your social space, consider the importance of soundproofing open floor plan homes.

Q:           We are doing a see-through fireplace in our contemporary home. It will be a prominent feature in the open space. Because of all the hard surfaces and the ceiling height I'm hoping we can come up with some way to incorporate acoustical properties since this is happening in a social space of our home. What type of treatment or product would you suggest?

A:            We love the open floor plan trend, but the exposed hard surfaces can cause a lot of sound issues - especially when you modify it even more with a see-through fireplace. There’s no need to sacrifice your design vision as long as you incorporate open floor plan acoustics.

The key is to break up your large reflective surfaces with soft absorbing materials. If you have carpet or drapes in the space, you’ve already made some improvements, but even if those are in your design they won’t get the whole job done. The best approach to soundproofing open floor plan homes is soft acoustic panels.

Acoustic panels placed throughout your space are designed to break up these surfaces and soak up echo, reverberation, and mid to high range frequencies. This creates a calm atmosphere where clear conversation can happen, perfect for social and entertaining space. We typically recommend starting by treating 10-25% of your total wall space, and building your open floor plan acoustics up from there until you achieve you desired sound.

The core of Audimute acoustic art panels, fabric sound panels, and all of our custom and signature panels are made from our recycled eco-C-tex™ material with an NRC rating of 1.0 for excellent sound absorption. All of our panels include hanging brackets, making soundproofing open floor plan homes as quick as mixing and matching colors, sizes, fabrics, and images to accent your fireplace centerpiece.

We have found that when working with contemporary homes and open floor plan acoustics it is often best to have a couple of photos to help us to get an idea of the space and how the sound might be moving in it. For more information about treating your space, give our Acoustic Specialist team a call at (866) 505-6883 today for personalized advice.

Check out this video from an Audimute Acoustic Specialist for more tips on noise control in open home floor plans:

FAQ: Ways to Soundproof a Kennel

Q:           We are looking for ways to soundproof a kennel we run in Westchester, New York. Our ultimate goal is to acoustically treat the room enough to stop sound transfer from the animals into neighboring businesses. We have done some research into Noise Reduction Coefficient (NRC) and are interested in the highest NRC rating we can find. What are the sound absorption ratings of Audimute products that would be best for us?

A:            You are on the right track looking for solutions with high NRC ratings.  A lot of animal lovers come to Audimute looking for ways to soundproof a kennel, apartment, or home because of our sound absorption ratings. In a situation like this where the concern is loud, reflective noises like barking and ways to stop sound transfer, your solution is adding soft materials to the walls. The kennels we have worked with have found our absorption sheets, eco-C-tex™ panels, and fabric acoustic panels are the best ways to do this:

Audimute Sound Absorption Sheets have an NRC of .65, meaning they absorb about 65% of the sound. Because of their size, absorption sheets also help to cover more surface area, reducing a greater amount of hard reflective surfaces.

• Eco-C-tex™ AcoustiColor™ flexible design acoustics have an NRC of .95, making this material a more effective option over the sheets. We’ve expanded the size and color options of our eco-C-tex™ line – and even include shapes and letters – making it easy to treat spaces of any size, and ceilings if needed.

• Fabric Sound Panels have an NRC of 1.0, absorbing 100% of the sound that hits them, and come in a few options. Original metal framed fabric acoustic panels are great to install in the first point of contact, meaning where the first place most of the sound hits the wall, to break up the hard surface. In a space such as a kennel you may need a larger, full coverage application, which is exactly what our new frameless fabric panels are designed for. These panels butt up next to each other for large scale, high traffic applications. These make it easy to build up your acoustic treatment until you reach your desired result, and can put on the ceiling if necessary.

Each of these products works by soaking up the majority of mid to high range frequencies, echoes, and reverberation before these sounds have a chance to transfer through your shared wall space. Our panels and sheets are hand crafted in the USA from fire rated, eco-friendly materials. Please keep in mind that they are not specifically designed to get wet, so we recommend placing them above crate level in the upper half of the wall.

Stop looking for ways to soundproof a kennel and take charge of your sound and space today by ordering your frameless soundproofing fabric panels. If you would like to discuss your space and the best acoustic approach, call an Acoustic Specialist today at (866) 505-MUTE for personalized advice, no strings attached.

Finding Reflection Points in a Home Theater

Home Theater Acoustics

Are you ready to improve the acoustics of your home theater? We receive countless inquiries about home theater treatment each day, and the most commonly asked question is where acoustic panels should be applied to most effectively improve the sound quality in the theater. Today, I am going to take you step-by-step on finding reflection points and how you can use this as a guide for perfect panel placement.

First, we need to discuss what reflection points are. The primary reflection points are the points throughout your theater at which sound is initially reflecting. In other words, it’s the first surface that sound comes in contact with after leaving your speakers. Primary reflection points are important to find as these are the most effective treatment points throughout your home theater.


Home Theater Reflection Points

Now picture this: you just finished your home theater set up! You spent hours shopping for the right speakers, the most comfortable couch, and the best screen or projector. You throw in your favorite movie and notice something: you forgot to take the room acoustics into consideration! Fear not! That echo you’re noticing can be treated by adding acoustic panels to your theater!

To find the reflection points, you will need the following:

      • A home theater

      • A handheld mirror

      • Sticky notes

      • A patient friend


1. First, set up the room as if it were finished. Speakers and seating in your space should be placed in their final

home Theaters
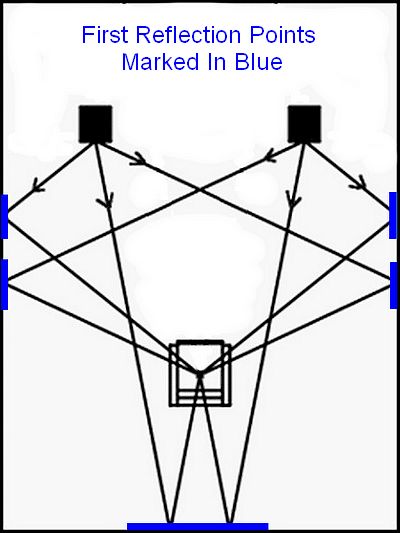
locations. Moving any of these elements will change the primary reflection points of sound throughout your space.

I recommend leaving the walls mostly bare (aside from any speakers). This will make the process of marking and finding reflection points much easier.

Once the walls are bare and the speakers are in their final position, it’s time to start listening. Carefully examine where the sound is coming from in the theater.

2. Second, have your friend hold the handheld mirror parallel to the wall surface. Face the screen in your theater, and move the mirror around the walls until you can see any speakers reflected in the mirror. Be sure not to move your head or tilt the mirror throughout this process, as this will alter the reflection points. Mark these points with a sticky note. These are the primary reflection points.

Reflection Points

Each speaker in your space should have 6 reflection points (one on each of 4 walls, one on the ceiling, and one on the floor). For a 5-speaker system, there should be 30 reflection points. Some of these points may not be treatable. This would include points that are blocked by open hallways, furniture, or other objects. This is not an issue. While treating primary reflection points is important, treating every reflection point is not necessary to improve the sound quality in your theater.

3. Once you have the reflection points marked, you can begin adding absorption.                 

For reflection points on the floor, consider adding a rug. If the theater is carpeted, treating the floor should not be necessary. For any windows, consider adding curtains or drapes.

To treat any reflection points on the ceiling, consider flush-mounting Acoustic Tiles to the ceiling surface, or suspending Acoustic Clouds from the ceiling.

Acoustic Panels in Home Theater

            Ceiling Acoustics                                                  

4. Finally, for the reflection points on the walls, consider adding Acoustic Panels. With a variety of sizes, colors, and styles to choose from, Audimute Acoustic Panels are an excellent option to consider for any home theater application.

For more advice on creating the perfect home theater, please don’t hesitate to contact one of our Acoustic Specialists!

Quick Tips for Setting Up a Drum Room

Drum room set up

November is International Drum Month. That means that now is the perfect time to set up your home drum room! When setting up your drum room, make sure to keep in mind the acoustics of your space. This will help to keep your neighbors (and the cops) away, while also ensuring that the space sounds great. 

Follow these helpful tips to help improve the acoustics of your drum room for yourself and your neighbors.


1) Consider drum kit location Drum kit location

Where you place the kit can have an impact on the sound in your drum room. For the best results, I would recommend placing the kit in the corner of your room, facing out towards the room. Keep the kit away from any shared walls. This will help to push sound into the room, instead of directly at any walls, and will help with the process of enclosing the kit, which brings us to the next tip…


Enclosed drum room

2) Enclose the kit (to the best of your ability)

Enclosing the kit can help to create a barrier around the drums. This will help to weaken the sound before it has a chance to reach the walls of your drum space. This can be accomplished using our Absorption Sheets. Placing Absorption Sheets behind the kit (one on each wall) will reduce the amount of sound reflecting off the walls. Hanging Sheets in front of the kit will help to effectively enclose the kit, creating a “room-within-a-room” with Absorption Sheets.


3) Treat any windows

Windows are a common point if weakness in most structures. Adding mass and density to any windows can help to reduce the amount of sound traveling through them. Creating a plug for the window using a heavy, rigid board is one option to consider. Isole® can be another great option to consider. The Peacemaker® inside of the Isolé is designed to help block the amount of sound capable of escaping through a window.

4) Don’t forget about doors

It’s important to treat any doors to your drum room. Anywhere air can travel, sound can also travel. Because of this, sealing off the door to your room will help to reduce the amount of sound capable of escaping your space. Isolé can also be a great option for door treatment, helping to provide mass and density to the door to your drum room.

Following these tips will help to improve your drum room for yourself, and all those around you. For additional questions on treating a drum room, please feel free to give our Acoustic Specialists a call at (866)505-6883.